Journal

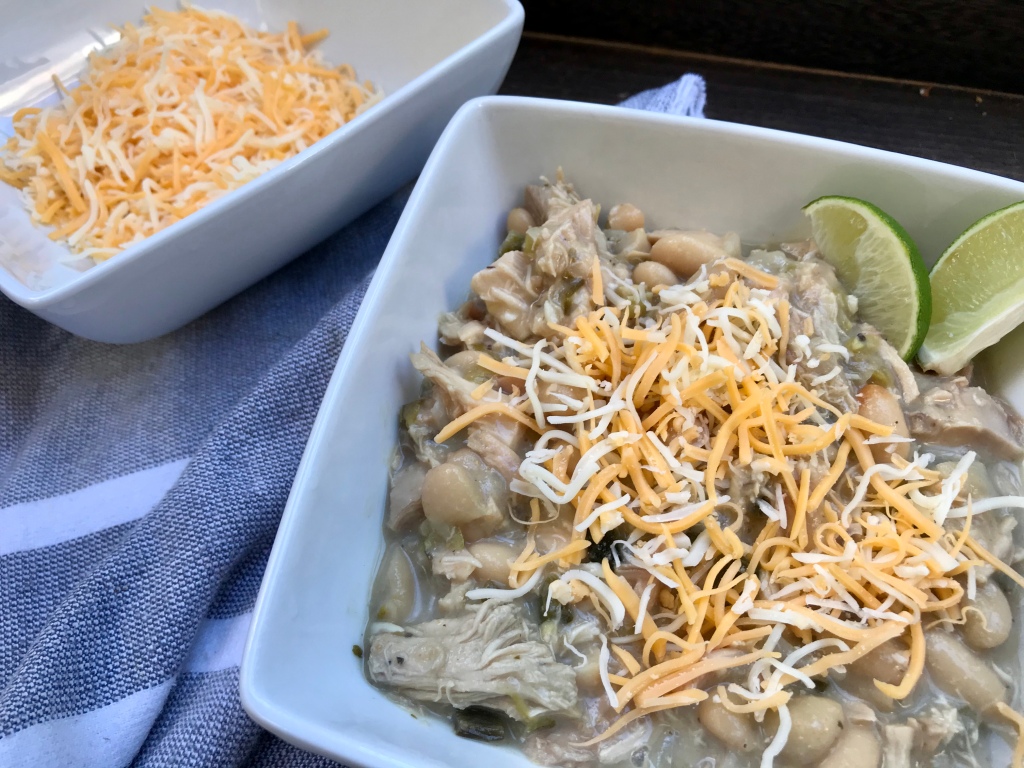
UPDATED Spicy White Chicken Chili

OH MY GOODNESS FRIENDS! I’m so glad you came back to my site to check out this UPDATED white chicken chili because it is AMAZING.

Mark and I are so happy to have sports back on TV. 2020 has been such a rough year for everyone to say the least; but sports have a special ability to bring people together and give them hope; sports give people something to believe in.

Chili is the perfect fall, sports food and I have been working to absolutely PERFECT the seasoning blend. Throw the seasoning box away because this is SO easy and SO worth the change! Plus, you can control the amount of salt you use.

Updated Spicy White Chicken Chili Recipe

Ingredients:

  • 2 tbsp olive oil or avocado oil
  • 1 medium yellow onion, finely chopped
  • 2 jalapeno pepper, finely chopped
  • 2 poblano peppers, finely chopped
  • 2 Anaheim peppers, finely chopped
  • 6 cloves garlic, minced or 2 tbsp minced garlic
  • 2 tbsp all-purpose flour
  • 4 cups low-sodium chicken broth
  • 3 cans cannelini or white beans, rinsed and drained
  • 3 cups chopped, cooked chicken – I used a rotisserie chicken from Costco
  • 1 tbsp lime juice
  • 1/4 – 1/2 cup heavy cream – depending on how creamy you want your chili
  • 1 tbsp paprika
  • 1 tsp salt
  • 1 tsp cayenne pepper
  • 3/4 tsp black pepper
  • 1/2 tsp oregano
  • 1/2 tsp thyme
  • 1/2 tsp red pepper flakes
  • 1 tsp cumin

Directions:

  1. In a small bowl, combine paprika, salt, cayenne pepper, black pepper, oregano, thyme, red pepper flakes, and cumin. Stir to mix. Set aside.
  2. Heat the oil in a large pot over medium heat until it is shimmering. Add the onion and peppers and begin to soften for a few minutes. Add the seasoning blend you just made. Cook until the vegetables have softened, for about 7 minutes. Stir in garlic and cook for another 30 seconds.
  3. Add the flour and stir until no raw flour remains and it will begin to emit a nutty aroma, about 1 minute. Slowly stir in the chicken broth. Add one can of beans and use a potato masher to mash the beans in the pot, creating a thicker texture.
  4. Stir in the remaining beans, the chopped chicken, and lime juice and bring to a simmer. Reduce the heat to low and simmer for an additional 20 minutes. Stir in the heavy cream and heat for an additional 5 minutes.
  5. Serve immediately with lime wedges, shredded cheddar-jack or Monterrey-jack cheese, cilantro, or sour cream/Greek yogurt. Leftovers can be stored in the refrigerator for up to 4 days.

Recipe Notes:

  • This chili definitely has a “kick” to it. I would label it as moderately spicy – think medium when it comes to store-bought salsa. If you prefer something milder, I would omit the cayenne pepper. If you want something with NO spice, then omit the jalapeno pepper as well.
  • This chili can also be made in the crockpot! Prepare the chili as directed up until leaving it to a simmer, then transfer it to a slow cooker and cook for 4 to 6 hours on low. Stir the heavy cream in about 30 minutes before planning to serve it.
  • I go light on the cream in this recipe, but if you really want super creamy chili, I’ve seen many recipes use cream cheese, so you could try adding that to your chili. If you do, snap some pictures and give me your feedback!
  • You can substitute ground turkey for chicken, if you’d like! Brown it along with the onion, peppers, and seasonings in step 1 and proceed with the rest of the recipe.
** As always, I’d love to hear your feedback and to see pictures of how these recipes turn out in your home. Leave me a comment or send me an email – I’d love to hear from you!

HEALTHY Pumpkin Chocolate Chip Banana Bread

Oh yeah, you read that title right. Chocolate chip. Pumpkin. Banana bread. A combination of some of the most incredible ingredients – I promise if you think this sounds good, it tastes and smells even better than you think!

When all foods have the ability to fit into your diet, delicious dessert (or breakfast) like this, is an absolute must.

This is the first year I have become absolutely obsessed with pumpkin everything. I don’t know why it took me almost 28 years for that to happen, but I’ve realized how versatile pumpkin can really be. It can be used for sweet desserts, or savory dinner recipes.

I had some very ripe bananas and knew I wanted to make banana bread… but figured since it’s pumpkin spice season, I had to make something more fall-like.

I love how this recipe turned out – it is moist and the perfect combination of pumpkin spice, banana, and chocolate.

Try it out for yourself and see!

Pumpkin chocolate chip banana bread

Ingredients:

  • 3 very ripe bananas
  • 2 eggs
  • 5 tablespoons melted and cooled unsalted butter
  • 1 cup pumpkin puree
  • 1/2 cup sugar
  • 1/2 cup honey (or maple syrup)
  • 2 1/2 cups all-purpose flour
  • 1/2 tsp salt
  • 1 teaspoon baking soda
  • 1 teaspoon baking powder
  • 2 teaspoons cinnamon
  • Optional but highly recommended: 1 teaspoon pumpkin pie spice
  • 1 1/2 cups chocolate chips or chocolate chunks

Instructions:

  1. Preheat oven to 350 degrees F. Lightly grease a loaf pan.
  2. In a large mixing bowl or mixer, combine bananas, eggs, butter, pumpkin puree, sugar, and honey. Mix well.
  3. In a separate mixing bowl, combine flour, salt, baking soda, baking powder, cinnamon, and pumpkin pie spice. Mix well.
  4. Pour dry ingredients into wet and mix to combine. Fold in chocolate chips and/or chocolate chunks, saving some to add to the top of the bread.
  5. Pour mixture into the loaf pan. Add remaining chocolate chips or chunks on top. Bake in the oven for about 60-65 minutes, or until a toothpick inserted in the center comes out clean.

Did you make this recipe? Leave a comment or tag me @amberrfitness on IG. Can’t wait to hear from you!

The ULTIMATE Breakfast Quesadilla

OK you guys, I attempted to make a video tutorial of how to make the best breakfast quesadilla… but my embarrassingly subpar video skills totally didn’t work. There was no way I was uploading a video with my arm covering half the screen LOL. So, pictures it is – which I think totally represents how delicious this quesadilla really is. Maybe I need to get Mark to buy me a tripod… *hint hint!

I freakin’ love quesadillas. I could eat them for every meal – plain cheese, shredded chicken, steak, LOVE them all! One of my favorite quesadillas of all time is from this little crappy drive-thru in Arizona that’s open 24/7. I can guarantee you that it is FAR from healthy, but man is it goooood.

Well, I decided to make a healthy breakfast version and it is DELICIOUS! Mark is wanting one at all hours of the day – and I will tell you he is by far my toughest critic.

What you will need for this recipe / what i use:
  • Tortillas – living in AZ, we find the BEST homemade tortillas. But, I do love Trader Joe’s homemade tortillas or Mission 100% whole wheat for regular use!
  • Eggs or egg whites
  • Cheese – I always buy
  • Sliced ham or turkey
  • Spinach
  • Sliced peppers
  • Sliced Mushrooms
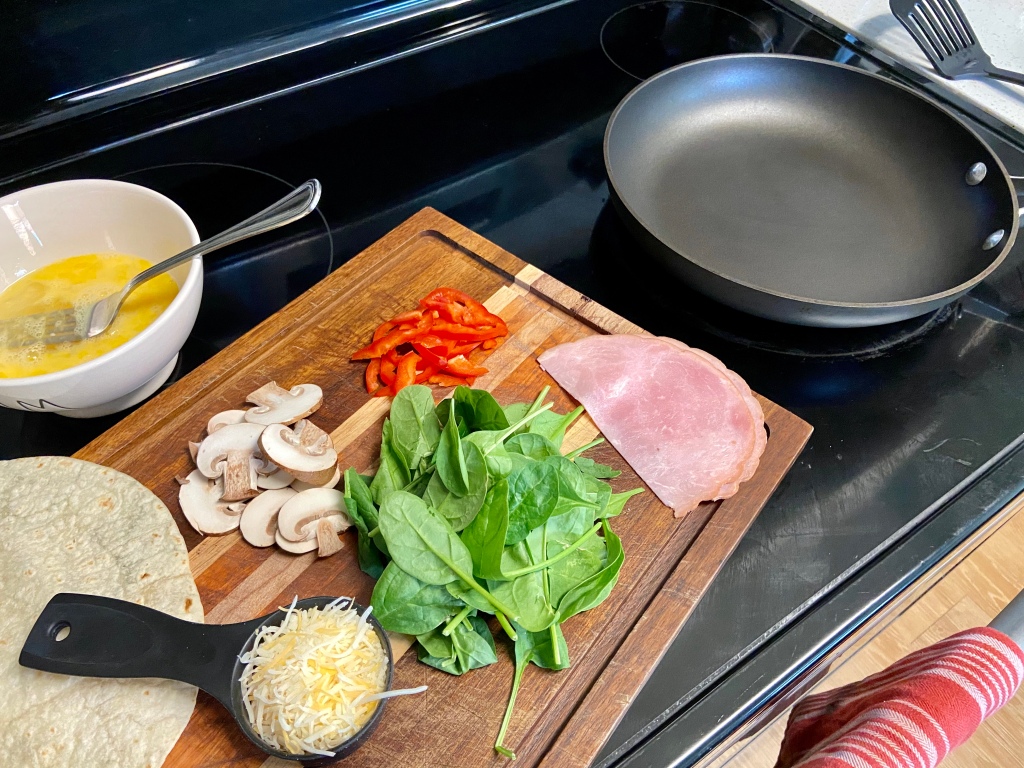
I always pre-slice and pre-measure my ingredients so they’re ready for use!

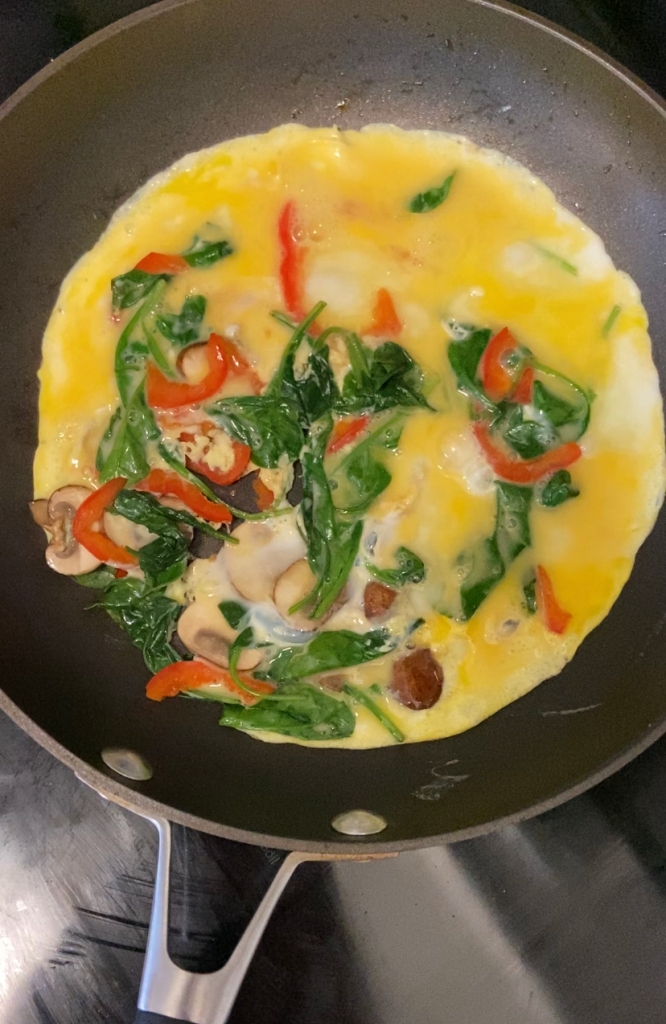
Heat your pan with non-stick cooking spray and saute your veggies first until they are cooked all the way through.

Now time for the eggs! I cook the ends on low to medium temperature so the bottom doesn’t burn. You’re going to cook it similar to how you would cook an omelet.

When your eggs are almost cooked through, cover with a tortilla and cook for another minute – the eggs will stick to the tortilla and make it easy to flip!

Flip it, add your meat and cheese, and let cook for a minute or two – give your tortilla time to crisp up a bit on the bottom.

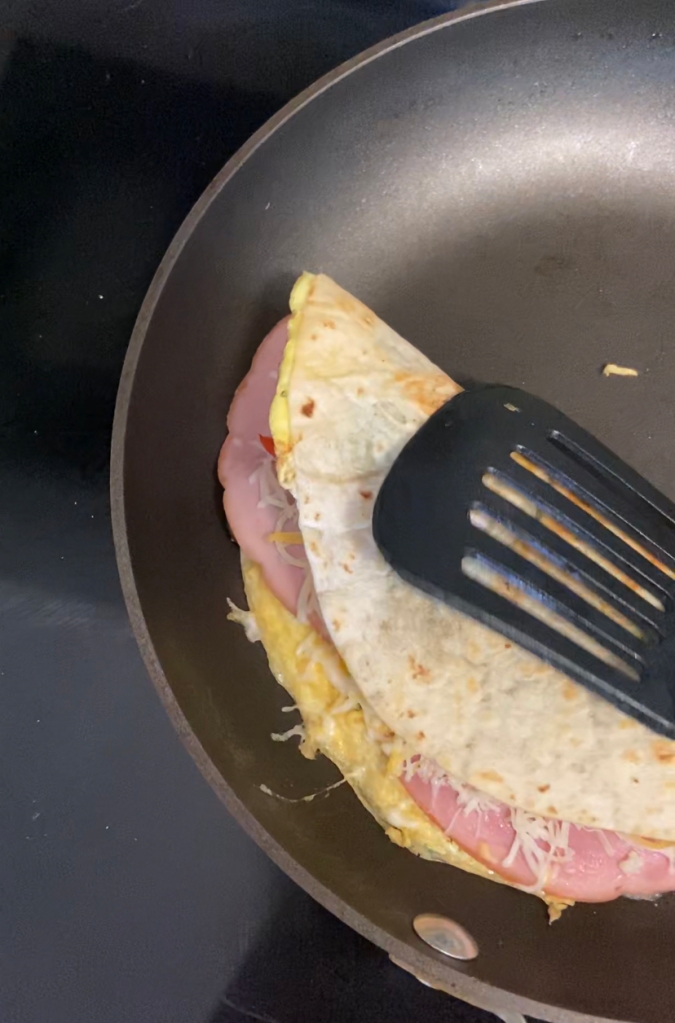
Lastly, fold your quesadilla over and let the cheeses melt. Serve with salsa, guac, cowboy caviar, or whatever you’d like! YUM!!

The recipe:

This is the easiest and most delicious breakfast quesadilla. You can feed your taste buds with any and all ingredients you LOVE.

Ingredients:

  • 1 tortilla
  • 2 eggs, 2-3 egg whites, or a combination of the two
  • 1/4 cup shredded light cheddar-jack
  • 1 slice ham
  • handful spinach
  • 2 mushrooms, sliced
  • 1/4 small red bell pepper, sliced

Instructions:

  1. Pre-slice and pre-measure your vegetables, cheese, and whisk your eggs in a small bowl.
  2. Heat your pan on medium heat and saute your mushrooms, spinach, and peppers until cooked through.
  3. Lower the temperature to medium to low and pour in your egg mixture, moving it around slowly, but keeping it in an omelet shape.
  4. When the eggs are almost cooked through, cover with a tortilla and cook for a minute or so – enough to let the eggs stick to the tortilla.
  5. Flip your tortilla over, add your ham and cheese and cook for a minute or so – enough to let the tortilla crisp up.
  6. Fold over and let the cheeses melt.
  7. Enjoy with salsa, guac, or cowboy caviar!

Another version I made with turkey, egg whites, spinach, and MOZZARELLA.

Be creative with your ingredients!

As always, leave a comment or tag me, amberrfitness, in your Always Hungry recipes on Instagram. You can also fill in the contact form! I look forward to hearing from you!

Paleo Peach Cobbler (Gluten-Free too)

The Best Paleo Peach Cobbler Ever made with a fresh peaches and topped with a gluten-free and refined sugar-free crumb topping.

Doesn’t summer just make you think about desserts using alllllll the fresh fruit?! I know I just LOVE anything with fresh peaches, berries, apples, and pears – ALL THE GOODIES.

I have found the most delicious selection of perfectly ripe peaches this season. I’ve been eating them plain, chopping them up in with my Greek yogurt or oatmeal, and now sharing this TO-DIE-FOR recipe for BEST Paleo Peach Cobbler.

What I love most about this cobbler recipe is that you’re not limited to just one fruit. You can use a mixture of apples and pears (YUM) or a mixture of berries (DELICIOUS). The options really are endless. And this recipe will be a perfect one to make during the Thanksgiving season as well.

OK, now let’s talk about the CRUMB TOPPING – grain free and so delicious.

Normally, crumb toppings contain tons of butter and sugar – which give it that perfect chewy but crispy texture. You can absolutely substitute butter in this recipe for coconut oil, but there is only a couple tablespoons of added sugar in this recipe, and it’s natural – which makes it ok, right?! It seriously has the best flavor to it.

The crispy cobbler topping and sweet peaches pear perfectly with a topping of vanilla bean ice cream (I’ve been obsessed with Open Nature Cashew Ice Cream) or creamy Greek Yogurt.

Ingredients you will need for this recipe:

  • Fresh (organic, if possible) Peaches – these are the base for this cobbler! When these aren’t in season, swap them out for apples and pears or a mixture of berries.
  • Honey – you can also sub maple syrup.
  • Cinnamon – you can also add 1/2 tsp each of nutmeg, allspice, and 1/4 tsp ginger. If you have apple pie spice on hand, that works as well.
  • Softened coconut oil – you can substitute this for unsalted butter or ghee. Any of these will work, but make sure they are softened and not melted or too firm.
  • Almond flour. I haven’t tried another substitute here but oat flour or regular/wheat flour may work.
  • Raw nuts – I love the flavor and texture of almonds and pecans but you can use any nuts you have on hand.
  • Unsweetened coconut flakes

Paleo Peach Cobbler (Gluten-Free too)

The Best Paleo Peach Cobbler Ever made with a fresh peaches and topped with a gluten-free and refined sugar-free crumb topping.

base Ingredients:

  • 4 large organic peaches
  • 1 teaspoon cinnamon
  • 1 tablespoon melted coconut oil

Crumb Ingredients:

  • 5 tablespoons softened coconut oil
  • 2 tablespoons honey
  • 1 cup raw almonds
  • 1/2 cup raw pecans
  • 1/2 cup almond flour
  • 2/3 cup unsweetened coconut flakes
  • 1 teaspoon vanilla extract
  • 2 teaspoon cinnamon

Instructions:

  1. Preheat oven to 350 degrees.
  2. Wash and slice the peaches and add to a 9-inch baking dish (round or square works).
  3. Coat the peaches in coconut oil and cinnamon and mix well.
  4. In a blender or food processor, pulse together the crumb ingredients a few times until a crumb-like dough forms.
  5. Add the crumb topping on top of the peaches and make sure it is covering majority of the dish.
  6. Bake in oven for 40-45 minutes and serve while warm.
  7. I like to broil for the last 3 minutes or so to get the topping nice and crispy.
  8. Top with Greek yogurt, ice cream, or whipped cream. Recently I’ve been OBSESSED with Open Nature’s cashew ice cream… YUM!

As always, leave a comment or post a picture of YOUR Paleo Peach Cobbler in the comments section. Tag me – amberrfitness on IG or shoot me an email at alwayshungryfit@gmail.com! Can’t wait to hear from you!

The BEST Edible Coconut Chocolate Chip Cookie Dough

This is the BEST edible coconut chocolate chip cookie dough, paleo and gluten free (keto if you use Lily’s Chocolate Chips), and takes less than 5 minutes to whip up! Healthier cookie dough is absolutely meant to be eaten by the spoonful… or in a ball form if you’re attempting not to eat the whole bowl in one sitting!

When I was a kid, I wanted to bake cookies, brownies, cakes, really anything with my mom all the time. And everyone loves my mom’s classic chocolate chip cookie recipe – seriously, it’s insanely delicious.

Every time we’d make cookies, once the batter was done, my brother and I would fight over who got to eat off the mixer whisk and sneak spoonfuls of cookie dough, raw eggs and all. Maybe it felt good to be rebellious, but the cookie dough was always the most delicious thing there ever was. I LIVE for cookie dough!

This recipe is… we’ll say, much healthier because it uses all healthy ingredients – almond flour, coconut flour, coconut sugar, non-dairy milk and coconut oil.

What ingredients you’ll need to make this edible coconut chocolate chip cookie dough:

  • Almond flour – you can sub the almond flour for Oat Flour.
  • Coconut flour – I haven’t tested another sub here yet.
  • Coconut sugar – brown sugar has a similar texture so you can use it as a sub!
  • Coconut Oil – in liquid form but you can melt solid coconut oil and let it cool. If you don’t want to use coconut oil, use extra nut butter.
  • Non-dairy milk – any will work!
  • Vanilla
  • Dark Chocolate Chips – because they’re good for the soul!

The Recipe:

This is the BEST edible coconut chocolate chip cookie dough, paleo and gluten free (keto if you use Lily’s Chocolate Chips), and takes less than 5 minutes to whip up! Healthier cookie dough is absolutely meant to be eaten by the spoonful… or in a ball form if you’re attempting not to eat the whole bowl in one sitting!

Ingredients:

  • 1 cup almond flour
  • 1/4 cup coconut flour
  • 1/4 cup coconut sugar
  • 1/4 cup non-dairy milk (any will work)
  • 3 tbsp coconut oil (melted and cooled)
  • 1/2 tsp vanilla
  • pinch of salt
  • 1/3 cup chocolate chips of choice

Instructions:

  1. In a medium bowl, mix together all of the ingredients besides the chocolate chips until smooth and well combined.
  2. Fold in chocolate and if wanting to eat with a spoon, ENJOY!
  3. If wanting to roll into balls, chill in fridge for 30 minutes.
  4. Roll into balls and store in the fridge for up to 5 days. If placed in freezer, defrost for a few minutes before eating.

** How easy was that?! No raw eggs scariness!

As always, leave a comment or post a picture of YOUR Edible Coconut Chocolate Chip Cookie Dough in the comments section. Tag me – amberrfitness on IG or shoot me an email at alwayshungryfit@gmail.com! Can’t wait to hear from you!

The BEST Snickerdoodle Bread

This is THE BEST gluten-free Snickerdoodle Bread that seriously tastes like a giant snickerdoodle cookie. It is made with all paleo and healthy ingredients and can be vegan, too (if you use flax eggs)!

I have been obsessed with using cinnamon in EVERYTHING lately. I’ve been adding it to my Breakfast Oatmeal Cupcakes and I also have a new Snickerdoodle Cookie Dough Truffle coming to you soon that I’ve been working on – OH MY GOODNESS you’re going to love it!

I truly think cinnamon is one of the most underrated ingredients and it doesn’t only have to be used around the holidays – it can absolutely be used all year round.

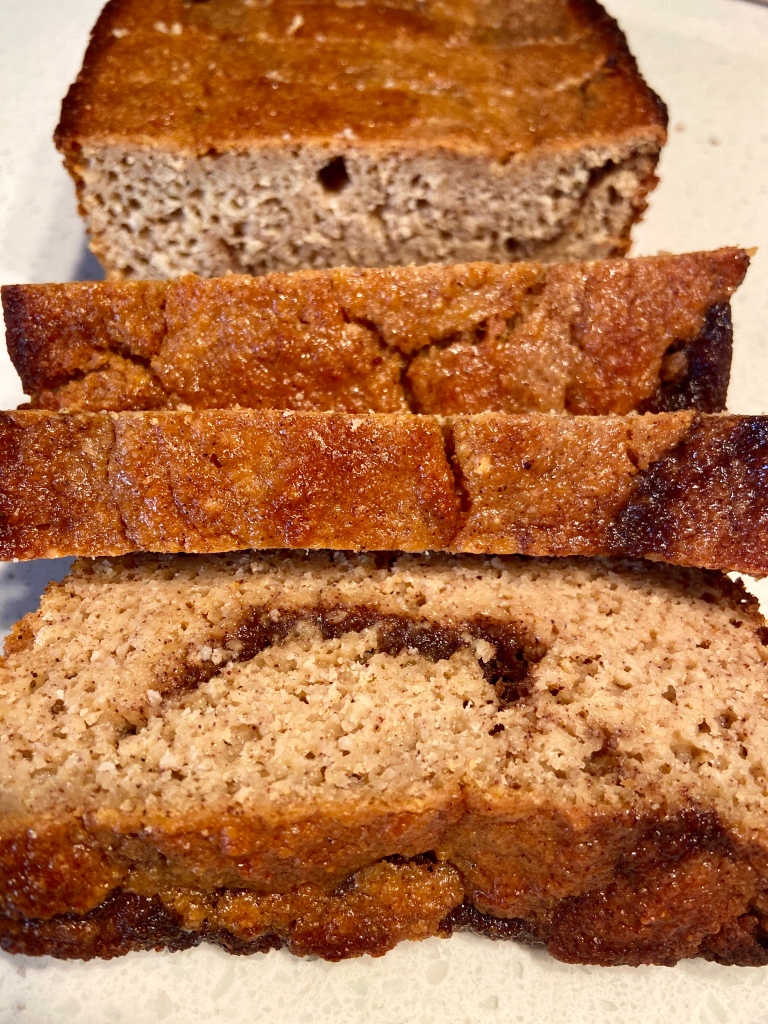
This snickerdoodle bread though… is so beyond delicious. Gluten-Free (can be vegan) and made with alllllll healthy ingredients!

You can definitely enjoy this bread anytime of the day. You can have it for breakfast topped with yogurt, applesauce, or some sauteed apples and cinnamon (YES). You can eat it as a midday snack. I bet a warmed slice of this Snickerdoodle Bread and a scoop of vanilla bean ice cream topped with sauteed apples and cinnamon would be the perfect dessert. I’m salivating just thinking about it and I hope you are too.

I swear you’ll be salivating while this bread is baking – my whole house smelled of snickerdoodle cookies and I LOVED IT.

And I can guarantee this bread won’t last long in our house because Mark looooves anything snickerdoodle.

Ingredients for my paleo & gluten-free Snickerdoodle Bread:

  • Almond flour and oat flour – what I love about using almond flour and oat flour is that they’re both light and nutty in flavor and both gluten-free. They can be used interchangeably, meaning you can use either 2 cups of almond flour or 2 cups of oat flour if you’d prefer instead of 1 cup of each.
  • Greek yogurt – you can use any yogurt you keep in the house.
  • Unsweetened applesauce – I love using applesauce as a natural sweetener.
  • Eggs or flax eggs – depending if you want the recipe vegan or not.
  • Honey – you can sub maple syrup if you’d prefer; you need a liquid sugar.
  • Coconut sugar – perfect for the topping! You can sub for brown sugar if you’d like.
  • Cinnamon – LOTS AND LOTS of it!

The Recipe:

Ingredients:

  • 2 eggs or 2 flax eggs
  • 1/2 cup Greek yogurt
  • 3 tablespoons unsweetened applesauce
  • 1/4 cup honey or maple syrup
  • 1 cup almond flour
  • 1 cup oat flour
  • 2 teaspoons baking powder
  • 1 teaspoon cinnamon
  • TOPPING: 4 teaspoons unsweetened applesauce, 1 teaspoon cinnamon, 2 tablespoons coconut sugar

Instructions:

  1. Preheat oven to 450 degrees and grease loaf pan well and/or line with parchment paper.
  2. In a large bowl or mixer, whisk together eggs, Greek yogurt, applesauce, and honey until creamy.
  3. Mix in almond flour, oar flour, baking powder, and cinnamon until smooth.
  4. Add half the batter to the loaf pan, then in a small bowl mix topping ingredients and add half on top.
  5. Add the remaining batter and then top with the rest of the topping and swirl well.
  6. Bake in the oven for 50-60 minutes, until a toothpick comes out clean.
  7. Cool for a few, slice, and ENJOY!

** Store in an airtight container for up to 5 days or freeze for longer.

As always, leave a comment or post a picture of YOUR Snickerdoodle Bread in the comments section. Tag me – amberrfitness on IG or shoot me an email at alwayshungryfit@gmail.com! Can’t wait to hear from you!

Healthy Air-Fryer Chicken Tenders

Can you guys believe that 4th of July is ALREADY HERE?! It seems like 2020 just started and we’ve been in this weird fog of a year. I don’t know how ya’ll feel… but I just keep continuing to cook and bake give myself inspiration.

Totally off topic, but you need to check out a few of my recipes I’ve been obsessed with during quarantine – they’re easy and the ingredients are staples I keep in my kitchen at all times:

Back to this weekend, IT’S 4TH OF JULY!

Normally, Mark and I would be BBQing with friends, hanging out by the pool, and enjoying tons of delicious home-cooked food. This year is a little different…. I think for everyone.

My body generally craves healthy, light foods – salads, fruits, etc… or something decadent and chocolate – I know, complete opposites from each other. My grandmother always told me that chocolate was one of the major food groups so I still follow that rule. Fourth of July has me craving fried foods – chicken tenders in particular. WHO AM I?! So I’m sharing my healthy version of air fryer chicken tenders and a honey-sriracha dipping sauce. You are going to LOVE IT.

The Recipe:

Ingredients for the chicken tenders:

  • 1 1/2 lbs boneless, skinless chicken breast cut into tenderloin-sized pieces
  • 1 egg
  • 2 tbsp coconut milk
  • 2 tbsp coconut flour
  • 2 tsp garlic powder
  • 2 tsp paprika
  • 1 cup Panko bread crumbs
  • salt and pepper to taste

Ingredients for dipping sauce:

  • 2 tbsp Dijon Mustard
  • 2 tbsp honey
  • 3 tbsp plain, nonfat Greek Yogurt
  • 1 tbsp lemon juice
  • 1 1/2 tsp Sriracha sauce

Mix all ingredients together. Store in an airtight container in the refrigerator.

Instructions:

  1. Preheat your air fryer to 370 degrees.
  2. Cut your boneless, skinless chicken breasts into tenderloin-sized pieces.
  3. Prepare 3 shallow bowls:
    1. In your first shallow bowl, combine coconut flour, 1 tsp of garlic powder, 1 tsp of paprika, and salt and pepper to taste. Mix well.
    2. In your second shallow bowl, crack your egg. Add the coconut milk and whisk it together.
    3. In your third shallow bowl, combine your panko breadcrumbs, 1 tsp of garlic powder and 1 tsp of paprika.
  4. Take a chicken tender, dredge it in your flour mixture and shake off the excess. Next, dip it in the egg mixture. Last, coat it completely with the panko mixture. Set aside on a plate or wire rack.
  5. Repeat with the remaining chicken tenders.
  6. Lightly grease your fry basket with nonstick cooking spray.
  7. Place your chicken tenders in the basket, in a single layer.
  8. Air fry for 14 minutes, flipping at the halfway mark.
  9. Repeat with the remaining chicken tenders.
  10. Serve hot with my homemade honey-sriracha dipping sauce, ketchup, or ranch.

As always, leave a comment or post a picture of YOUR air fryer chicken tenders in the comments section. Tag me – amberrfitness on IG or shoot me an email at alwayshungryfit@gmail.com! Can’t wait to hear from you!

Rachl Mansfield’s (almost) Copycat Paleo Vegan Banana Bread

One-bowl paleo vegan chocolate chip banana bread

OK guys, I just HAD to share this recipe with you because I am now OBSESSED with it! Literally, I had to freeze it to stop myself from eating the whole loaf in one sitting – but then I realized how delicious it was cold too – I seriously think I have a banana bread addiction.

Banana bread addictions really do exist though – especially if y’all were to try my grandma’s recipe. LET ME TELL YOU – it isn’t healthy by any means but it’s TO DIE FOR. I’ll share it another time – maybe when I’m having a weak craving moment… LOL.

Back to this recipe though, I figured now would be the perfect time to share because everyone has been making banana bread during this quarantine. I was searching for a recipe that would be healthy, but also moist and delicious and easy to make. This one bowl recipe seemed like the perfect one – I couldn’t wait to try it.

I substituted a couple ingredients, just because of what I had in the house, but they worked out perfectly. Coconut sugar (which Rachel uses in her recipe) has a similar texture and consistency to brown sugar (maybe not a healthy, but I knew it would work and be the perfect substitute).

Unbaked to baked – it ALWAYS looks and smells delicious!

Rachl Mansfield’s (almost) Copycat Paleo Vegan Banana Bread:

Ingredients:

  • 1 1/2 cup mashed banana (about 3 large bananas)
  • 3 tablespoons ground flaxseed
  • 1/4 cup brown sugar (her recipe uses coconut sugar – I just didn’t have any at home)
  • 1/4 cup non-dairy milk
  • 4 tablespoons liquid coconut oil – I only had solid so I melted it and let it cool before using it.
  • 1/3 cup creamy nut butter – I used organic Almond Butter.
  • 1 teaspoon vanilla extract
  • 2 teaspoons baking powder
  • 2 cups almond flour
  • 3 tablespoons coconut flour
  • 1 cup-ish dark chocolate chips (her recipe uses 1 Hu Kitchen Dark Chocolate Bar, chopped)

Instructions:

  1. Preheat oven to 350 degrees and grease a bread dish with coconut oil and/or line with parchment paper.
  2. In a large bowl, mix together the banana, ground flax, brown sugar, milk, coconut oil, nut butter and vanilla extract until smooth and creamy.
  3. Mix in the almond flour, coconut flour and baking powder until well combined with no clumps.
  4. Fold in the dark chocolate then add to bread dish and bake for about 50-60 minutes (or until toothpick comes out clean!)
  5. Allow the bread to cool for a bit then slice and enjoy!

Notes:

*Store leftovers in airtight container for 3 days, fridge for a week or freezer for 2 months

Other Recipes you might like!

Recipe Credit:

Thank you to Rachl Mansfield for the recipe and the inspiration! – https://rachlmansfield.com/one-bowl-paleo-vegan-chocolate-chip-banana-bread/

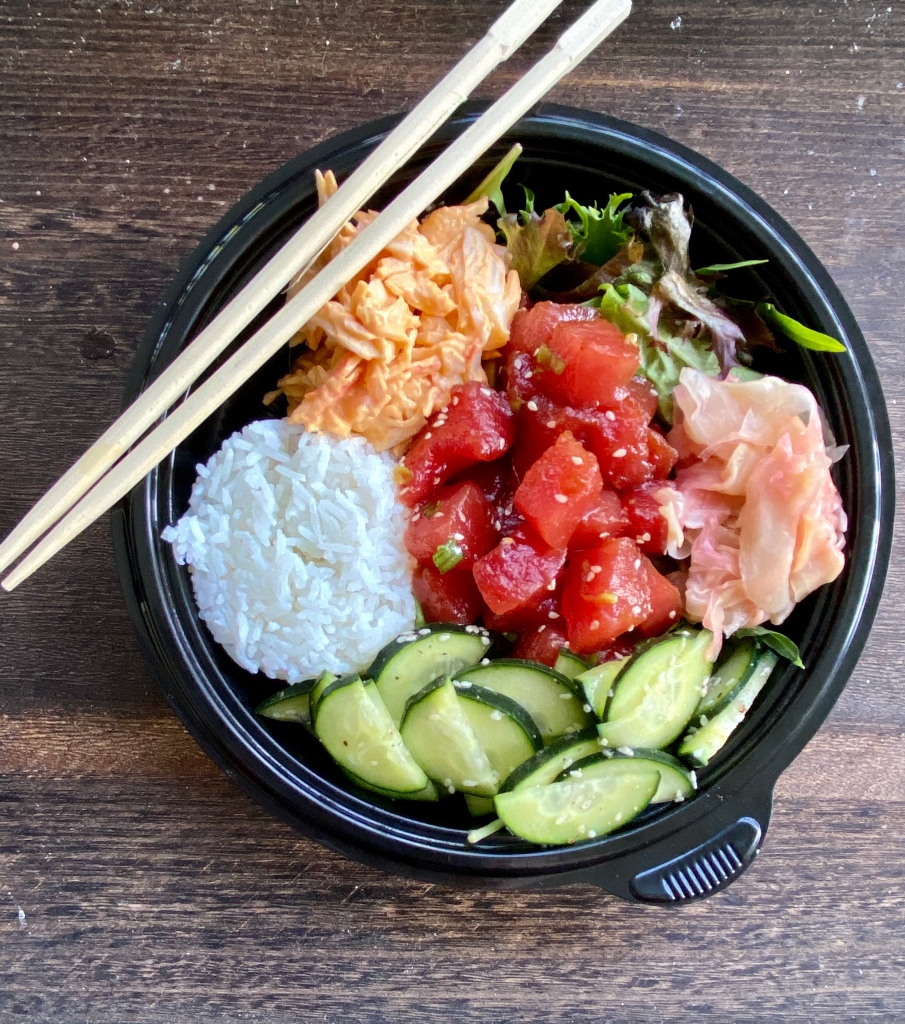
Homemade POKE Bowls

The weather has been so warm here in Columbia. I definitely think it feels warmer to us west-coast babies than others who live here because the humidity KILLS us. So thankful for air conditioning and de-humidifiers out here…LOL!

On these warm days, Mark and I crave smoothies, popsicles, Poke bowls, salads (maybe that’s just me LOL) – but really anything cool or cold that’ll take the edge off from the heat. And with Corona-virus still circulating and keeping many businesses from operating, the few Poke restaurants near us have been closed – SO SAD! Of course we’re wanting and craving the one food we can’t get right now.

Maybe this was a blessing in disguise because…

I told Mark, “of course I can replicate your Poke bowl” because I’m always up for a challenge in the kitchen!

The recipe

Ingredients:

For the Poke:

  • 1 pound sushi-grade ahi tuna
  • 2 green onions, sliced
  • 3 tablespoons low-sodium soy sauce
  • 1 1/2 teaspoons sugar
  • 1 tablespoon white sesame seeds
  • 2 teaspoons sesame oil
  • 2 teaspoons Sriracha

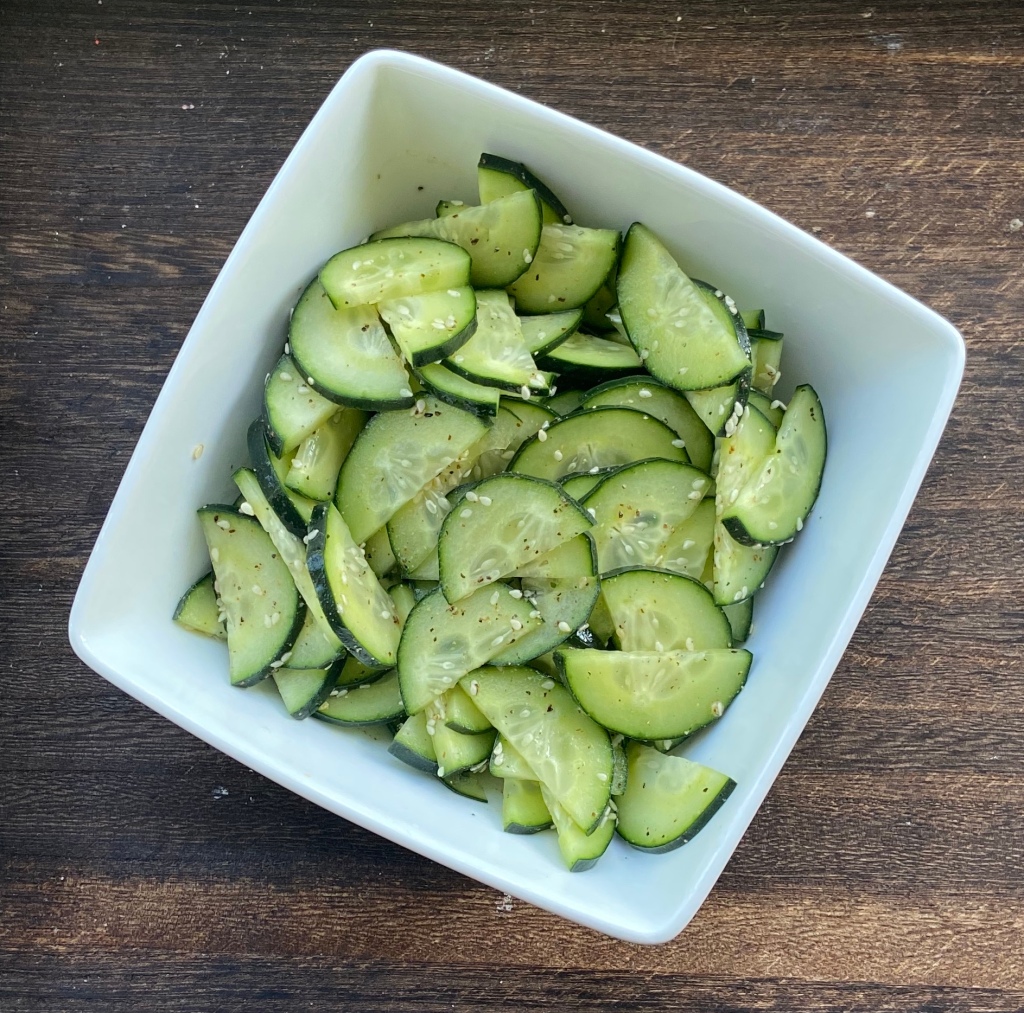
For the Cucumber salad:

  • 1 cucumber – washed and thinly sliced
  • 2 1/2 tablespoons rice wine vinegar
  • 1 tsp sesame oil
  • 1/4 teaspoon sea salt
  • 1/2 teaspoon black pepper
  • 1 tsp sesame seeds

For the spicy Crab salad:

  • 1 package imitation crab meat (easy shred)
  • 1/3 cup mayonnaise (I used Olive Oil Mayo)
  • 1 teaspoon Sriracha – or more to taste

For the rest of the bowl:

  • cooked jasmine or brown rice
  • mixed greens
  • avocado
  • sliced cucumber
  • shredded purple cabbage
  • seaweed salad
  • furikake
  • sliced jalapenos
  • sliced mango
  • pineapple chunks
  • green onions
  • edamame (soy beans)
  • Etc.

Directions:

I have only been able to find sushi-grade tuna in the frozen section, so while it defrosts, I focus on making both the cucumber salad and crab salad. By the time those are done, the ahi is usually ready to work with.

for the cucumber salad:

  1. Wash and thinly slice the cucumber and place into a medium-sized bowl.
  2. Add the vinegar, sesame oil, salt, and pepper and mix together, coating all the cucumber.
  3. Top with sesame seeds if you wish – I love the flavor they give and the slight crunch.
  4. Eat right away or cover and store in the fridge for up to 2 days.

for the crab salad:

  1. Shred the imitation crab into long strips in a medium-sized bowl. I used my hands – which can get a little messy, but it’s the fastest way!
  2. Add the mayo and Sriracha to a small bowl and mix together.
  3. Pour the mayo mixture over the crab and mix to coat evenly.
  4. Eat right away or cover and store in the fridge for up to 2 days.

for the poke:

  1. Cut ahi-tuna into bite sized pieces.
  2. Combine all poke sauce ingredients in a medium-sized mixing bowl. Add cut ahi-tuna and mix to combine and coat all tuna pieces.
  3. Refrigerate for about 30 minutes before serving for BEST RESULTS.
  4. To make your bowl, start with a base of rice, a combination of rice and mixed greens, or all mixed greens. Add your poke. Top with as much of each remaining ingredient as you would like!
  5. Enjoy!

As always, leave a comment or post a picture of YOUR poke bowl in the comments section. Tag me – amberrfitness on IG! Can’t wait to hear from you!

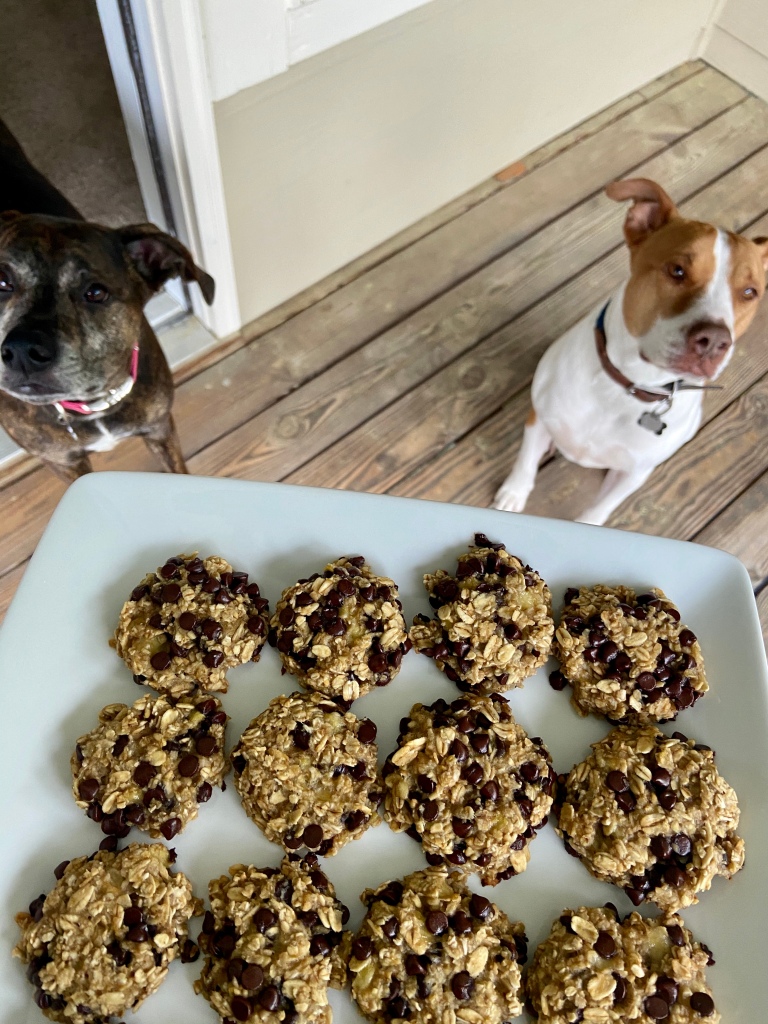
3 Ingredient Banana Oatmeal Chocolate Chip Cookies

OK, first, let me apologize for being COMPLETELY MIA since January. Life has been a complete roller-coaster since then and especially lately, as I’m sure many of you can relate.

Let me give ya’ll a bit of a life update so you know what’s going on. Plus, I’d love to hear what’s going on with all of you as well! – Tell me in the comments section or reach out in an email!

OK, so… Pretty much since we’ve moved to South Carolina, I’ve been working 40-60 hours a week at BJ’s Restaurant which I love. I work with some really awesome people and also get to meet really amazing and inspirational people every day. Mark has also been doing great at work, absolutely LOVES being in the fitness industry – his total passion. We’re BUSY. Between both of us working 40-60 hours a week, taking care of our pups (total babies), working out for at least an hour and a half every day… we are BUSY; and we love it.

Fast forward to March 17th… Corona Virus takes over and both Mark and I, unfortunately, work in industries that have been heavily affected.

March 20th… Mark had to have emergency surgery to have his gallbladder and a hernia taken out. THANKFULLY, he is recovering very well and back on the mend… but holy crap… it has been a crazy month!

The good news is that I’M BACK and I have TONS of recipes to share with you all!

The recipe

I had these ripening bananas sitting on the counter for a few days and I knew I wanted to make something with them, instead of just throwing them away. I also didn’t want to trek to the store and was hoping to use only ingredients I always keep at home. Oats and chocolate chips it is! It’s that simple and so delicious!

Ingredients:

  • 4 medium-sized bananas, ripe*
  • 1 1/4 cup old fashioned oats
  • 1 cup quick oats
  • just under 1 cup mini semisweet chocolate chips

Instructions:

  1. Set the oven rack to the upper-middle position and preheat to 350 degrees.
  2. Line a baking sheet with parchment paper or a nonstick baking mat or spray with nonstick cooking spray and set aside.
  3. Peel the bananas and add to a medium-sized mixing bowl. Using a fork, mash the bananas until smooth, getting rid of all lumps.
  4. Add the oats and mix well. If the mixture seems too wet, mix in a few more tablespoons of quick oats.
  5. Add the chocolate chips and stir to combine.
  6. Scoop one tablespoon of batter onto the baking sheet and flatten to about 1/2-inch thick with your fingertips. Repeat for the rest of the batter, spacing the cooking an inch apart.
  7. Bake for 15 – 20 minutes, until puffy.
  8. Remove from the oven and let cool. ENJOY!

Notes:

  • *Look for ripe bananas with brown spots. If they’ve turned completely brown on the inside, they’re too ripe.
  • These cookies will not spread in the oven, so make sure you form them into a cookie before baking.
  • Try different mix-ins: Instead of chocolate chips or in addition, you can try blueberries, chopped apples, sliced almonds, dried fruit, dried coconut etc. – all great options!
  • Make it GLUTEN FREE: simply use gluten free oats to avoid any risk of contamination from wheat.
  • Make it SUGAR FREE: simply use sugar-free chocolate chips instead of regular chocolate chips.
  • Storage: Let the cookies cool completely and store in an airtight container at room temperature for up to 2 days, You can also freeze them for up to 3 months in an airtight container with parchment or wax paper in between layers to prevent from sticking.

They’re so yummy, even the pups want them! LOL!

As always, leave me a comment in the comments section or reach out via email – amber2fit@gmail.com. Share your pictures and reviews with me! I’d love to hear from you!